Showing posts with label tutorial. Show all posts

Sunday, 8 June 2025

Peeking inside the mind of a norn: what happens when we take parts away?

Norns are so complex, and they work (on the whole) so well that it is hard to see the function of particular parts without removing them.  

Socrates: who could not learn

An early success in removing norn functionality was Socrates, a norn  who cannot learn, but who must rely on her instincts and the player's guidance to function in the Albia of Creatures 2.  Socrates led to the breakthrough, around the time of OHSS, that the learning feature was broken, which led to the development of the Canny Norns and other genetic breeds for C2.

Instinctless: When smart norns get too smart

Conversely, the good behaviour of C3 norns has lead to some players yearning for the numbskulls of yore - leading to various experiments into instinctless creatures, such as the  No-instinct Norn by Slaterbait and instinctless norns by Amaikokonut.  What these experiments revealed is the symbiotic balance between instinct and learning. Remove instincts, and the Norn becomes a blank slate. Fascinating, maybe even rewarding to raise, but also desperately inefficient without human help - particularly when lifts are involved.

Dreams: the bridge between instinct and learning

Sleep isn't just downtime for Norns—it's an essential part of how they process and apply their instincts. According to the CAOS command DREA, dreaming is where the creature experiences the situation and the consequence while they sleep, and then another situation and consequence every five seconds, strengthening the neural network between the dream situation presented and actions held in instincts.  Norns also dream while they are waiting to hatch, so a norn who feels no need to sleep is not quite the same as a norn who has no instincts, but they should behave similarly: particularly for instincts which only switch on at adulthood.

The Combination Lobe: Where norns make up their minds

In the brain of a C3 Norn, real decision-making happens in the combination lobe. This part of the brain decides what action to take on which object—like whether to eat food or hit it. Each neuron in this lobe represents one specific action-object combination, and it fires based on a mix of inputs: the Norn’s current drives (like hunger or boredom), how close the object is, whether the object or action was recently mentioned, and even how it smells.

All these factors come together to help the creature choose the most relevant, goal-driven behaviour. It's not random—it’s a carefully weighted decision. The combination lobe is what makes a Norn’s actions feel intentional, responsive, and lifelike. The genome that came with the game constantly overwrote the combination lobe's information with new learning, which sometimes caused confusion. This was tweaked in the Creatures Full of Edits and genomes based on the CFE. Here, the new intel only adds to previously-learned information, which allows for a more average experience of food to dominate here: a weird invention that dispenses fatty goodies and pain should cause less confusion.

What We’ve Learned from What We’ve Lost

Removing parts of the Norn system—learning, instincts, sleep—is more than a curiosity. It’s been a way to understand the elegant, interconnected systems that make Norns feel alive.

  • Instinct without learning gives you rigid, predictable creatures.

  • Learning without instinct gives you naive, chaotic adventurers.

  • No sleep? You get Norns who could know better—but don’t.

And without a properly functioning combination lobe, even a well-fed, well-informed Norn struggles to act. It’s here that all other systems—drive, perception, memory—are brought together and turned into meaningful decisions. Break that link, and even perfect instincts and learning can't express themselves.

Each system plays a role, and each missing part makes us appreciate the whole. Like any real organism, Norns aren’t just the sum of their parts—they're the interaction of those parts.

So whether you're raising a genius or a lovable numbskull, remember: every Norn has its place in the digital Darwinian dance. And sometimes, breaking things is the best way to understand how and why they work.

Sunday, 18 May 2025

Roaming in C3 critters

 Roaming in C3 critters is almost considered an 'else' state after everything else is handled - it is a normal state that critters return to as a default behaviour.  But roaming isn’t just filler—it’s an integral part of the critter's behaviour tree that ensures believable, conflict-free, and performance-friendly actions.

The normal logic flow in the timer script

 Typically, roaming is switched on by OV00 (State) being 0, and it is considered the last step in the normal logic flow in the timer of most C3 critters - which typically follows this pattern:

  1. increase age
  2. decrease energy
  3. if old enough, increase sex drive
  4. drown in water - lose energy rapidly
  5. if low on energy (sometimes also OR if too old) flag for death
  6. if hungry flag to get food
  7. if sex drive high, flag to mate
  8. obstacle checking - sometimes also water-shyness
  9. if flagged for death go to die subroutine
  10. if flagged to get food, get food
  11. if flagged to mate, mate
  12. if flagged to roam, roam 

You’ll notice roaming comes last—it’s what a critter does when it’s not busy trying to survive, eat, mate, or die. Think of it as a "what now?" behaviour that kicks in when all else is calm.

The logic flow in the timer script being arranged around two phases - first flagging, then checking the flags - is an example of a behaviour tree. This has the benefits of avoiding conflicts in behaviour, creating a predictable flow, allowing for lifelike complexity (flagging for multiple behaviours allows the system to choose between them with DOIF logic), while being performance friendly.

Before you move

Navigating the World: How Obstacle Checking Works

In a world full of walls, slopes, water, and other creatures, critters need a way to avoid running headfirst into trouble. That’s where obstacle checking comes into the timer's logic flow—just before the critter decides what to do next, and crucially, before it performs any roaming behaviour.

Obstacle checking happens between flagging and acting. This allows the critter to alter or cancel its next intended action if something is physically in the way, preventing it from trying to move through a wall.

Direction Memory: How Critters Know Where They're Going

It's also important to understand how a critter "remembers" which direction it's trying to go in. This is usually done using two object variables:

  • OV10 – Stores the left/right movement direction

  • OV11 – Stores the up/down movement direction

These values help the critter maintain consistent direction between ticks of the timer script—even if it gets distracted or interrupted (say, by a curious Norn picking it up). They’re essential to making movement look fluid and purposeful.

Roaming: More Than Just Wandering

The roaming subroutine itself is built on a layered system of nested subroutines, creating lifelike complexity without chaos. The main roaming call includes:

  • subr roam

    • subr vect – Picks a random direction

    • subr anim – Sets the correct walking animations based on direction

    • subr move – Applies motion using direction data

By nesting logic like this, developers avoid redundancy and reduce bugs—especially those caused by copy-pasting the same code across multiple scripts.

Interestingly, even “special” behaviours like eating or mating briefly use the roaming-related nested subroutines vect anim and move. This helps reset the critter’s motion naturally, allowing it to continue behaving in a believable way after completing a focused task.

1. subr roam: The Control Hub

At the top of the roaming behaviour stack is the roam subroutine. Think of this as the orchestrator—it's the entry point that decides whether and how the critter should move.

The roam subroutine typically does three things:

  • Runs a random chance check: This is used to occasionally trigger special roaming behaviours specific to a species. For instance:

    • A hedgehog might randomly decide to burrow.

    • A grasshopper might chirp.

    • Other critters might sniff, pause, or perform ambient animations.

    These special behaviours give each critter type its own personality and make idle time feel alive.

  • Changes direction occasionally: Using another random roll, the roam routine may decide to alter the creature's current path, which keeps its motion from looking too linear or mechanical. 

  • Calls the three nested subroutines: Once direction and behaviour have been decided, roam hands off control to the nested logic for handling movement:

    • subr vect

    • subr anim

    • subr move

2. subr vect: Choosing a Direction

The vect subroutine is where direction gets set. This subroutine simply:

  • Picks a new random direction for the critter to head toward.

Because this direction change happens at the end of a completed behaviour cycle (e.g., after eating, mating, or completing a wander loop), the shift in direction feels natural and not abrupt.

The randomness is constrained enough that it avoids chaotic zig-zagging but ensures that the critter won’t pace in a straight line until it hits a wall.

3. subr anim: Choosing the Right Animation

Now that we know where the critter wants to go, it’s time to make it look like it’s going there. That’s where anim comes in.

This subroutine:

  • Selects the correct walking or movement animation based on the current direction (OV10, OV11).

  • Ensures that the visual feedback matches the movement intent—a critter moving left plays a "walk left" animation, and so on.

Animations in Creatures 3 are not just eye candy—they’re essential for readability and believability.  anim ensures the visuals reflect the internal logic.

4. subr move: Making the Critter Move

Finally, move applies the logic that turns direction and intent into actual motion.

This subroutine:

  • Adjusts the values of OV10 and OV11, moderating the direction based on the new vector chosen in vect.

  • Calculates the velocity the critter should move at.

  • Applies motion by setting the velocity directly.

Where vect decides where to go, and anim decides how it looks, move is what actually causes the critter to move on-screen.

Together, these three nested subroutines called by roam allow each creature to wander its environment convincingly, which is why they are also called in the gfod and mate subroutines.

Saturday, 10 May 2025

Mating behaviour in C3 critters

Mating in C3 critters is a special state which is typically controlled by sex drive (OV21) increasing past a threshold (when they are old enough), and by a flag being set - although food is considered more important.

The normal logic flow in the timer script

 Typically, mating is switched on by OV00 (State) being 6, and it is an intermediate step in the normal logic flow in the timer of most C3 critters - which typically follows this pattern:

  1. increase age
  2. decrease energy
  3. if old enough, increase sex drive
  4. drown in water - lose energy rapidly
  5. if low on energy (sometimes also OR if too old) flag for death
  6. if hungry flag to get food
  7. if sex drive high, flag to mate
  8. obstacle checking - sometimes also water-shyness
  9. if flagged for death go to die subroutine
  10. if flagged to get food, get food
  11. if flagged to mate, mate
  12. if flagged to roam, roam

The logic flow in the timer script being arranged around two phases - first flagging, then checking the flags - is an example of a behaviour tree. This has the benefits of avoiding conflicts in behaviour, creating a predictable flow, allowing for lifelike complexity (flagging for multiple behaviours allows the system to choose between them with DOIF logic), while being performance friendly.

Mating strategies

Interestingly, some critters have male and female types (OV06 being 0 or 1) and find an opposite sex mate to impregnate (reusing some code from the hunting food behaviour, as in the hedgehog and the dragonfly), and some simply reproduce parthenogenetically (without needing to find or hunt a mate) when their reproductive drive is past a certain threshold (and they have enough energy), such as the hoppity.  Additionally, even some critters that find mates and get pregnant only use pregnancy as a binary state (pregnant or not) rather than having a gestation period.

Reproduction Step-by-Step: a Hedgehog in Love

Let’s walk through how a hedgehog goes from carefree youth to proud parent:

1. Maturity and Sex Drive

  • The hedgehog ages via the ov01 counter.

  • Once it passes age 1000 and enters adulthood (ov05 = 2), it starts building sex drive (ov20).

  • This happens gradually, simulating the onset of reproductive maturity.

Fun detail: The "youth" hedgehog is actually removed and replaced by an adult version—a trick to avoid bounding box errors.

2. Seeking a Mate

  • When sex drive (ov20) exceeds 200, the hedgehog changes state to "Find Mate" (ov00 = 2).

  • It searches nearby using genus and species markers (ov47, ov48, ov49) for a compatible mate of the opposite sex.

3. Mating Process

  • If a suitable mate is found, the state changes to "Mate" (ov00 = 6). If a mate is not found, the hedgehog returns to roaming behaviour. An error in this logic, fixed in the Norn Woodland Fix Patch, is that ov16 should not be set to null twice before calling the find subroutine, and that hedgehogs are curiously undiscerning of their target's gender when seeking a mate.

  • The mate subroutine verifies gender compatibility and, if successful, sets the pregnancy counter (ov70 = 1) for females.

  • The sex drive (ov20) is reset to 0 after mating.

4. Pregnancy and Birth

  • The pregnancy counter (ov70) increases over time.

  • When it exceeds 10, the hedgehog enters "Give Birth" state (ov00 = 7).

  • The layg subroutine handles the birthing process, spawning new baby hoglets.

Once their part in the mating ritual is finished, the parent hedgehogs return to roaming (ov00 = 0), ready to begin the cycle again.

Key Variables for Reproduction

  • ov06 – Gender: 0 = female, 1 = male

  • ov00 – State:

    • 0 = Roam

    • 2 = Find Mate

    • 6 = Mate

    • 7 = Give Birth

    • 99 = Die

  • ov20 – Sex drive level (increases with age and plays a role in determining when a hedgehog seeks a mate).

  • ov70 – Pregnancy counter: When it’s greater than 0, the hedgehog is pregnant.

  • ov01 – Age counter: When the hedgehog reaches a certain age (1000), the script starts checking for mating behaviour.

  • ov16 – Target (food or mate): Used to track the hedgehog’s current mate.

  • ov05 – Life stage (1 = youth, 2 = adult).

  • ov02 – Energy: Used for survival but also affects mating behaviour. If low, the hedgehog seeks food.

  • ov73 – Hunger threshold: If energy drops below this, the hedgehog seeks food.

Visualizing the Process:

  • Roam (ov00 = 0) → Find Mate (ov00 = 2) → Mate (ov00 = 6) → Pregnancy (ov70 1-10) → Give Birth (ov00 = 7) → Roam (ov00 = 0)

This flow ensures that hedgehogs mature, seek mates, reproduce, and care for their young, all while adhering to a life cycle that mirrors natural behaviours. Note that this is laser-focused on only the reproductive cycle, and seeking food takes priority in the hedgehog's mind - it cannot search for a mate until it has first checked if it is hungry.

 Bugs 

One particularly odd case is the dragonfly, whose mating behaviour appears to be a bit of a bug—literally and figuratively. While it starts the process of finding a mate using the same targeting logic as other critters, it sometimes treats them as prey instead of a partner—approaching the intended mate only to eat them rather than complete the mating process. This quirky behaviour likely stems from overlapping use of the ov16 target variable, the fact that dragonflies hunt their own whole genus, the fact that dragonflies are more likely to be in contact with energy-draining water bodies, and a bug in state transitions, causing the dragonfly’s natural instincts to blur in a way that's more predatory than romantic. This bug is fixed in the Steam and GOG.com editions of Creatures Exodus.

Conclusion: Added realism and depth

While the mating logic in Creatures 3 operates entirely behind the scenes, it plays a fun and crucial role in making the ecosystem feel alive, real and self-sustaining. It’s not something players typically see directly—but it quietly governs when critters reproduce, how they prioritise needs, and how population dynamics shift over time, such as when a norn develops a taste for hedgehogs.

At the heart of this system is a behaviour tree structure: a two-phase loop where the critter first flags possible actions based on internal variables (like hunger or sex drive), and then acts based on priority. This design avoids conflicting behaviours, keeps things running efficiently, and allows complex decision-making to emerge from relatively simple rules.

This kind of background scripting, although largely hidden from view, adds realism and complexity to your creatures’ world—creating behaviours that feel organic, even when driven by simple variables and checking a list of possible states.

Sunday, 4 May 2025

Hunger and Hunting in C3 Critters

Eating in C3 critters is a special state which allows them to keep living, and is a multi-step process beginning with low energy triggering the search, searching for food, finding food and hunting for food.

The normal logic flow in the timer script

Typically, getting food is switched on by OV00 (State) being 1, and it is the first step in the normal logic flow in the timer of most C3 critters - which typically follows this pattern:

  1. increase age
  2. decrease energy
  3. if old enough, increase sex drive
  4. drown in water - lose energy rapidly
  5. if low on energy (sometimes also OR if too old) flag for death
  6. if hungry flag to get food
  7. if sex drive high, flag to mate
  8. obstacle checking - sometimes also water-shyness
  9. if flagged for death go to die subroutine
  10. if flagged to get food, get food
  11. if flagged to mate, mate
  12. if flagged to roam, roam 

The logic flow in the timer script being arranged around two phases - first flagging, then checking the flags - is an example of a behaviour tree. This has the benefits of avoiding conflicts in behaviour, creating a predictable flow, allowing for lifelike complexity (flagging for multiple behaviours allows the system to choose between them with DOIF logic), while being performance friendly.

The gfod Subroutine: Your Critter’s Inner Forager

When it’s time to eat, the gfod (get food) subroutine takes over. It’s more than a simple “go to food” instruction—gfod is a nest of smaller routines: find, hunt, vect, anim, and move, all working together to give your critter a believable foraging pattern, while avoiding the common coding error of repeating yourself.

Let’s walk through the full food-finding journey:

Step 0.5: The Critter Gets Hungry

Every time the timer runs, the critter’s energy (OV02) drops by 1. If it falls below the hunger threshold (typically stored in another variable, OV73), the critter flags itself as needing food—and gfod is called into action.

Step 1: gfod — Search Phase Begins

This is where the critter starts searching for food:

  • Temporary variables (VA47, VA48, VA49) define what kind of food it’s looking for—based on family, genus, and species. A 0 means “any”.

  • If there’s already a food target saved in OV16, the critter jumps straight to hunting it with hunt.

  • Otherwise, it calls the find subroutine to scout for the nearest edible object.

Bonus: Some critters, like hedgehogs, have varied diets—gfod can be expanded to look for secondary food types if the favourite isn’t found. (Just be careful they don’t accidentally target themselves if the critter is looking for its own genus in general.)

Step 2: find — Locating the Nearest Snack

In this subroutine, the critter:

  • First sets up a temporary variable to hold a massive number (VA99 = 99999999) and then changes that to be the shortest distance found from a target food item (VA58).

  • Scans nearby objects using esee, filtering by the desired food types.

  • Calculates the squared distance to each object with the Pythagorean theorem.

  • If something closer is found, it updates the new, closer target (VA58) and sets OV16 accordingly.

  • If nothing is found, the critter gives up—for now—and sets the target to null before changing its direction.

Step 3: hunt — Move to Target and Eat

Once a target is locked in, the critter enters hunting mode:

  • It checks that the target (OV16) is still valid and hasn't disappeared.

  • It figures out the direction to move by comparing its own coordinates with the target’s, adjusting movement vectors (OV10 and OV11) accordingly.

  • When it reaches the target—touching it—the critter switches its state to the next one in the main logic's behaviour tree and tells the food it’s been eaten (mesg writ OV16 12) and adjusts its own energy. (targ ownr subv ov02 ov72)

Ants behave a bit differently here: instead of eating on the spot, they pick up the food (OV18 tracks the carried food) and head back to the nest, with a message (mesg writ OV16 4) sent to the food to signal collection.

Step 4. Return to roaming

The critter reuses a little roaming behaviour after it has been hungry, got food, found food, and hunted food successfully to randomly change direction and start moving - and the behaviour tree will continue on with other activities.

Conclusion: A Background Mechanic With Quiet Complexity

While critters eating is a simple background function in Creatures 3, it's a surprisingly intricate part of what keeps critters behaving believably. From hunger detection to food targeting and pursuit, the eating system is built with clear logic, modular structure, and enough flexibility to support varied diets, differences between critters, and environmental challenges.

It’s not flashy, and it rarely calls attention to itself if it's done well—but it quietly supports the broader simulation and creates a vibrant world for creatures to live in. By using a behaviour tree model, flag-based decisions, and reusable subroutines, the developers created a system for critters that’s both efficient and extensible.

Understanding how critters eat offers a window into how even the “invisible” mechanics in Creatures 3 are carefully crafted. It’s a reminder that beneath the surface of every lifelike action is a system designed to keep the world moving.

Moving on

Wednesday, 4 April 2018

How to make a simple remover COB for a Creatures 2 official object

Download Slink's Creatures 2 scriptorium and unzip it.  

Then open the "c2scrp.htm" file in your web browser and you'll get a list that looks a little like this: with sprite files, names, class numbers.


The Scriptorium browser that's available with the Creatures 2 CAOS Tool is more comprehensive, as it comes directly from your copy of the game, particularly for more complex objects, like the Vibraphone, but for a quick reference to sprites and class numbers, Slink's Creatures 2 Scriptorium is where it's at.


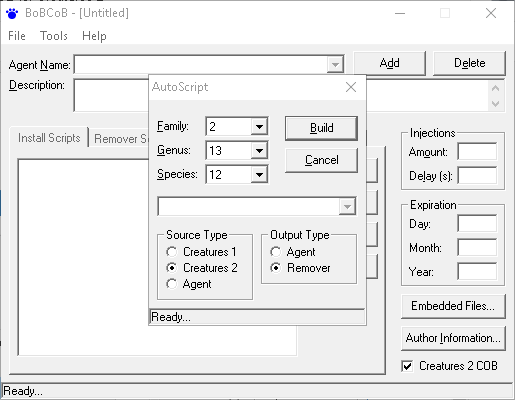
Open up Bobcob and choose the autoscript function:


Choose preferences

Tick Source type: Creatures 2, and output of Remover.  Then use the C2 Scriptorium list from before to choose the correct class number, then click Build:


It will then create a new script for you.

inst
enum 2 13 12
kill targ
next
scrx 2 13 12 1
scrx 2 13 12 4
scrx 2 13 12 5
scrx 2 13 12 6
endm

Note that this script will remove all the purple balls from the world:

inst
enum 2 13 12
kill targ
next

and all the associated scripts:

scrx 2 13 12 1
scrx 2 13 12 4
scrx 2 13 12 5
scrx 2 13 12 6

before quitting:

endm

To have a script that simply removes the balls while leaving their scripts intact, you would use the code:

inst
enum 2 13 12
kill targ
next
endm

Move the script from the "Remover Script" section to the "Install Scripts" section, and remove the script from the remover section.

This will allow you to inject it as if it was any other COB.

Final touches


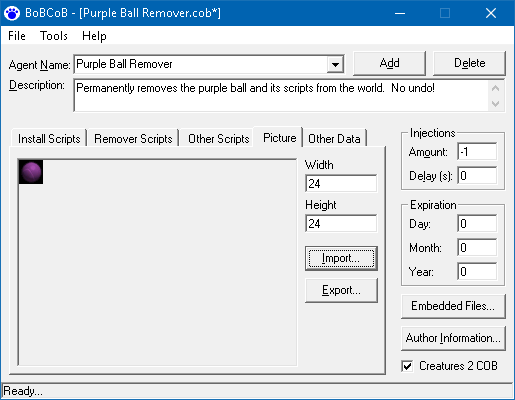
In the Picture tab, use Slink's C2 Scriptorium to find the correct sprite file name from your game and import the image - this can help prevent crashes.  The sprite for the purple ball is dbal.s16.


Now, the little * in the name of the COB means that the file needs to be saved, so I'll go ahead and do that.  The amount being -1 means there are infinite amounts of purple ball remover.  

Download

If you just want to get rid of those purple balls right this second, download the fruits of this tutorial.

Moving on

It's possible to stack remover scripts together in one script so that you can remove more things at once, for example to write a script removing the purple ball (2 13 12) and the green tennis ball (2 13 5) AND all their scripts, you would use the following:

inst
enum 2 13 12
kill targ
next
enum 2 13 5
kill targ
next
scrx 2 13 12 1
scrx 2 13 12 4
scrx 2 13 12 5
scrx 2 13 12 6
scrx 2 13 5 1
scrx 2 13 5 2
scrx 2 13 5 3
scrx 2 13 5 4
scrx 2 13 5 5
scrx 2 13 5 6
endm

Note that the green tennis ball has more scripts associated with it than the purple one does.  I would not recommend creating a 'Remove All' remover COB like this because the inst command makes things happen in 1/10th of a second - so putting too many things in one remove script might make the game crash.

Another use for a simple remover script like this:

inst
enum 2 13 12
kill targ
next
scrx 2 13 12 1
scrx 2 13 12 4
scrx 2 13 12 5
scrx 2 13 12 6
endm

would be to put it in an installation script for a new object using the same class number - so that the purple ball is removed before a new object is created.  

Tuesday, 17 January 2017

Fixed Turkey and Fixed Pudding

I hope everyone enjoyed the Creatures Community Spirit Festival 2016 - I know I did.  Congratulations to Allekha and Doringo for pulling it all together!

I thought I should post a CAOS walkthrough of the Fixed Christmas Pudding and Fixed Turkey (they are identical, bar the sprites and class numbers used) to demonstrate how they work.


First, the original script:
scrp 2 6 5 1
snde chwp 
stim writ from 10 255 0 0 35 250 34 10 57 150 0 0 
pose 1 
endm

Note how the pudding doesn't vanish from the world (using KILL) in the eat script here - this is accomplished by the drop script in the original, leading to a food item that only vanishes once it is dropped - not so good for learning!

The fixed editions have an additional feature that turns these from one-shot treats to easy-to-find emergency rations.

*Eat script for the pudding
scrp 2 6 5 1
*Make a noise
snde chwp
*stimulate the thing that made the script fire, jiggle its brain a little, and give it some nutrients
stim writ from 10 255 0 0 35 150 34 30 57 150 0 0
*strike a pose
pose 1
*WAIT for a second
wait 10
*If there's only one pudding in the world (the eaten pudding in the creatures' paws)...
doif totl 2 6 5 eq 1
*instantaneously
inst
*create a new pudding
new: simp holi 3 0 3500 0
*identical in class to the one before it
setv clas 33948928
*put it in the kitchen
mvto 2934 900
*same attributes
setv attr 67
*same behaviours
bhvr 0 1
*it says hello to the world, and is ready to eat
mesg writ targ 8
*end the if-there's-only-one-pudding check
endi
*the eaten pudding removes itself in its own eat script
kill ownr
*and the script ends
endm

Wednesday, 6 July 2016

How to Save Webpages to the Internet Archive's Wayback Machine

If you don't know it yet, the Internet Archive is a non-profit digital library "offering permanent access for researchers, historians, scholars, people with disabilities, and the general public to historical collections that exist in digital format". Taking inspiration from the Library of Alexandria, the Internet Archive includes texts, audio, moving images, and software (DOS games!) as well as archived web pages, and provides accessible services for people with disabilities.
We can use the Internet Archive to see what the web was like in the early days - including Cyberlife's Welcome Mat, circa January 1997. You might even have a browser extension such as Resurrect (Firefox) or Go Back in Time (Google Chrome) that makes it easier to call up the Internet Archive when faced with a 404.
You may not know that in addition to accessing archived websites, we can also proactively save webpages and downloads to the Internet Archive as follows:
Open the Internet Archive in a new tab and go to the bottom left corner.
Copy the URL of the website you want to archive into the Save Page Now box.

A box on the screen will appear saying that the Internet Archive is saving that page, then it will redirect you to the newly-archived copy of that page. You can then browse around the site and direct the Internet Archive to save any other pages (adoptions, information) that you see.
Another way you can use to save pages easily is to use a JavaScript bookmarklet to add that feature to your browser, available at Marklets.com. To add the bookmarklet, simply drag and drop from the blue button to your browser toolbar.

A link item will appear saying 'Save Page to Wayback Machine'. From then on, you can simply click that link to send any webpage you are on to the Internet Archive.
Not all pages will be able to be archived - some webmasters exclude access to the Internet Archive by using the robots exclusion standard, also known as robots.txt. The potential to be opted out of the archival process must be explicitly opted out of if desired.
Note also that when saving a page to the Internet Archive, any pages linked to from that page (such as downloads) must be visited by you in order to be saved.
Go forth, and happy archiving!

Tuesday, 24 May 2016

How to Add Chemicals to the Science Kit in C1

If you've read the promotional material for the purple mountain norns or the life kit norns, you know that they use new chemicals to produce new effects and behaviours in the norns.  The trouble for mad scientists is how do you track and measure these new chemicals?

This is how you can manually add new chemicals to your in-game Science Kit. 

Firstly, if you're using The Albian Years, use the remastered patch to make sure your Genetics Kit can talk to the game.  Before you get started, the relevant files to make backups of are 'allchemicals.str', 'chemicals.str' and 'themes.str'.

Open the official Genetics Kit and go to the Biochemistry tab.  Scroll down to chemical 80 (purple mountain alcohol or dancing) and click on the leftmost number.  Then click "Add Here".  It will pop up a window giving you the option to name chemical 80 (if you've chosen "Add" by mistake, it will give you the option to name chemical 73), and then provide a caption.  Captions can be added later, and they won't show up in-game.  Scroll down to 91 (Activase), 92 (Turnase) and 93 (Collapsase) and use the "Add Here" button to add names to those chemicals.

When you're happy with it, go to the advanced menu at the top and choose Save Chemical List, then Install Chemical List.  It will give you an option asking you if you're sure, and let you know if it can make a backup or not.  (Yes, you are sure, because you made a backup at the beginning.)

The next time you open your game and scroll through the Science Kit's list of chemicals, you should find the new chemicals in between Vitamin C and Energy.  This graph shows the results - a hippy purple mountain norn enjoying the altered pianola with chemical 80 named 'Jive'. 

Monday, 7 December 2015

Blue Drum Walkthrough

 Hopefully by now, you're enjoying the Creatures Community Festival 2015!  I thought I would post up a CAOS walkthrough of the Blue Drum COB I made, with the aid of The Lone Shee's C1 Scriptorium Browser, CrEd32 and BoBCoB.

Install script:

inst
Install this COB in one tick.
new: simp bdru 1 0 3500 0
Our COB is a simple object, using one image from the bdru.spr file, and it will appear in front of the creatures who use it.
setv clas 34147072
the COB is in class 2, genus 9 and species 11.
setv attr 70
The hand can pick up the drum, the hand can activate the drum, and the COB is "wallbound".
bhvr 2 3
The hand can bang the drum even if it's already banging.  Creatures can push and pull the drum.
edit
The drum will appear in the hand when it's been injected into the world.
endm
End of the install script.

Push script:

scrp 2 9 11 1
The script for family 2, genus 9, species 11, activation function #1.
snde drm1
Make a drum noise.
stim writ from 10 255 0 0 43 50 34 60 22 10 44 50
If you were the drummer, you get the following C1 chemicals: 50 Boredom Decrease, 60 NFP Decrease, 10 Tiredness Increase, 50 Anger Decrease.
stim shou 10 255 0 4 43 5 34 5 0 0 0 0
If you were listening to the drumming, you get the following C1 chemicals: 5 Boredom Decrease, and 5 NFP Decrease.
endm
End script.

Pull script:

scrp 2 9 11 2
The script for family 2, genus 9, species 11, activation function #2.
snde drm1
Make a drum noise.
stim writ from 10 255 0 0 43 50 34 60 22 10 44 50
If you were the drummer, you get the following C1 chemicals: 50 Boredom Decrease, 60 NFP Decrease, 10 Tiredness Increase, 50 Anger Decrease.
stim shou 10 255 0 4 43 5 34 5 0 0 0 0
If you were listening to the drumming, you get the following C1 chemicals: 5 Boredom Decrease, and 5 NFP Decrease.
endm
End script.


External script:

scrp 2 9 11 17
This script is called for the creature that pushes the drum. For this script, OWNR means the creature and the drum is _IT_.
impt 3
Tells the creature that what it's about to do is slightly important.
aim: 0
Makes the creature go to the right place on the drum to activate it.
appr
Approach the drum.
wait 4
Wait a little bit.
reps 6
Repeat the following actions 6 times:
pose 69
Go into pose 69
snde drm1
Play drumming sound if you're visible on screen.
pose 70
Go into pose 70
snde drm1
Play drumming sound if you're visible on screen.
repe
Finish the 6 times repetition of posing and drumming.
mesg writ _it_ 0
Call Script #1 (push script) for the drum.
pose 12
Take pose 12.
wait 4
Wait a bit.
impt 0
The next action you're about to take isn't important at all.
wait 20
Wait a bit longer.
done
Tells the creature that the action has been completed.
endm
Ends the script.

External script for the hand:

scrp 2 9 11 50
This script is called for the hand when the hand activates the drum.
anim [4540]
Make the hand appear to slap the drum and go back to normal.
endm
End the script.

The removal scripts are handled in the RCB, as always.  Check out the Creatures CAOS Guide to learn more about the commands used in this object.

Thursday, 9 July 2015

How to Convert a C1 SPR File to a C3/DS C16 File

How to convert a C1 SPR file to a C3/DS C16 file, using The One Stop Sprite Workshop and Jagent.

Get The One Stop Sprite Workshop and Jagent.

Choose a SPR file to work with. If it is an official Creatures 1 sprite, then Gameware’s general copyright exception applies, but with other sprites, it’s a good idea to get the permission of the original COBbler.

Open the SPR file with The One Stop Sprite Workshop. If you navigate to the folder that your sprite is in, but you can’t see it, make sure that you check that the ‘Files of type:’ dropdown is showing ‘Creatures 1 Sprite Files (*.spr)’.

You should see a small preview with a black background. Go to File > Save As and choose ‘Creatures 2 Sprite Files 16 bit format (*.s16)’, and save it with a sensible name. Close The One Stop Sprite Workshop.

Open this S16 file with Edos, and you should see the agent itself with a blackish border, without a background. Go to Save and save it with a sensible name, AND the .c16 extension. (For example, saving a lemon sprite as lemon.c16). In addition, you have to use Edos’s dropdown option to choose ‘Files of Type’ ‘Compressed Sprite File (*.c16)’.

Thursday, 30 April 2015

A C3/DS Agent PRAY File

PRAY files are used to compile agents and make them appear in the C3 or DS Creator, by explaining to the game how they should appear in the creator and what files are included in the agent file.  We're going to go through this example PRAY file line by line, explaining what each part does.   PRAY files can be saved as .txt files, or .ps (PRAY Source) files and can be used with a variety of tools (PrayBuilder, easyPRAY, Monk, etc.) to create agent files.

Typically, the commentary is below the code.

"en-GB"
This lets the game know that this section of the PRAY code is for the English engine. 

group AGNT "My Awesome Agent (C3)"
The name in the C3 Creator - this must be different from the DS name.  The tag AGNT is necessary for the Creator to identify this as an object kind of agent, instead of, say, a breed's egg agent.

"Agent Type" 0

This marks the file as suitable for injection.

"Agent Animation File" "myawesomeagentimage.c16"

This is where you specify the name of the sprite file that will be used to display the agent on the C3 Creator's screen.

"Agent Animation Gallery" "myawesomeagentimage"
This also refers to the image of the agent portrayed on the Creator screen. This section will be used to fill in the NEW: command, and as such the name of the sprite file is entered without the file extension.

"Agent Animation String" "0"
This can be used to specify the animation sequence displayed on the Creator screen, but 0 is fine for non-animating display pictures.  If you're animating a string, do not enclose the sequence in square brackets. "1 2 3 255" is ok.

"Agent Bioenergy Value" 0
This is used to specify the amount of bioenergy it costs you to create this agent in Creatures 3.  A value of 0 here makes this a free agent.  The amount of bioenergy yielded by recycling the agent is determined by an object variable in the cos file for the agent.

"Remove script" "enum X X XXXX kill targ next scrx X X XXXX 1 scrx X X XXXX 2"
This allows you to specify a chunk of code that will allow the agent to be removed from the game, simply by clicking the remove button on the Creator machine.  Replace the XXes with your classifers and don't forget to use scrx to remove the scripts as well!

"Script Count" 1
Specify how many COS files are needed for this agent not how many event scripts there are! Usually this will be just 1 file, unless you like to keep your events and installations in separate files.

"Script 1" @ "myawesomeagentscript.cos"
For each script specified above there needs to be one of these lines. This gives a name to each script file needed.

This following section is where you tell your agent what files it needs to run.  It does not include them in the file.

"Dependency Count" 3
Specifies how many external dependencies this agent will use. Each sprite file, catalogue file or sound file counts as a separate dependency.

"Dependency 1" "myawesomeagentimage.c16"
This section is for declaring the name for each dependency specified above.

"Dependency Category 1" 2
This section is to state where each dependency should reside, with respect to the Creatures 3 directory structure. It tells the game where to unpack that file to.  There needs to be one of these lines for each dependency.

0 is for the main C3 directory.
1 is for the Sounds folder.
2 is for the Images folder.
3 is for the Genetics directory.  (Used in breeds.)
4 is for the Body Data directory. (Used in breeds.)
5 is for the Overlay Data directory.  (Used in clothes!)
6 is for the Backgrounds directory. (Used for metarooms.)
7 is for the Catalogue directory.
10 is for the My Creatures directory. 

"Dependency 2" "chwp.wav"
"Dependency Category 2" 1
"Dependency 3" "myawesomeagent.catalogue"
"Dependency Category 3" 7

And now we're done with the C3 portion of the code.

group DSAG "My Awesome Agent (DS)"
This lets the game know that this name is for the DS creator.  It needs to be different from the C3 name.

"Agent Type" 0
This marks the file as suitable for injection.

"Agent Description" "My Awesome Agent is awesome and makes a noise."
This appears in the DS creator when the player looks through their list as a description of the agent.

"Agent Description-fr" "Ma Awesome Agent est impressionnant et fait un bruit."
"Agent Description-de" "Mein Awesome Agent ist genial und macht ein Gerausch."

You can also add French, German, Italian (it), Spanish (es) and Dutch (nl) descriptions.

"Web Label" "Creatures Caves"
"Web URL" "www.creaturescaves.com"
This causes part of the Creator machine to store your website's address and can be used to launch your site in their web browser from their game.  The game already does the http:// and the last / automatically. 

"Agent Animation File" "myawesomeagentimage.c16"

This is where you specify the name of the sprite file that will be used to display the agent on the DS Creator's screen.

"Agent Animation Gallery" "myawesomeagentimage"

This also refers to the image of the agent portrayed on the Creator screen. This section will be used to fill in the NEW: command, and as such the name of the sprite file is entered without the file extension.

"Agent Animation String" "0"

This can be used to specify the animation sequence displayed on the DS Creator's screen, but 0 is fine for non-animating display pictures. If you're animating a string, do not enclose the sequence in square brackets. "1 2 3 255" is ok.

"Agent Sprite First Image" 0
Used by the agent injector to display your agent to the player.

"Remove script" "enum XX XX XXXXX kill targ next scrx XX XX XXXXX 1 scrx XX XX XXXXX 2"
This allows you to specify a chunk of code that will allow the agent to be removed from the game, simply by clicking the remove button on the Creator machine. Replace the XXes with your classifers and don't forget to use scrx to remove the scripts as well!

"Script Count" 1

Specify how many COS files are needed for this agent not how many event scripts there are! Usually this will be just 1 file, unless you like to keep your events and installations in separate files.

"Script 1" @ "myawesomeagentscript.cos"

For each script specified above there needs to be one of these lines. This gives a name to each script file needed.

Note that this cos file is the same as the one in the C3 section - this assumes that the cos file itself checks if you're running C3, C3 docked with DS, or DS standalone.

Another way of doing it is to include a "myawesomeagent C3.cos" in the C3 section, and a "myawesomeagent DS.cos" in the DS section.  If you do so, the script count for each section remains 1. 

"Dependency Count" 3

Specifies how many external dependencies this agent will use. Each sprite file, catalogue file or sound file counts as a separate dependency.

"Dependency 1" "myawesomeagentimage.c16"

This section is for declaring the name for each dependency specified above.

"Dependency Category 1" 2

This section is to state where each dependency should reside, with respect to the Docking Station directory structure. It tells the game where to unpack that file to. There needs to be one of these lines for each dependency.

0 is for the main DS directory.
1 is for the Sounds folder.
2 is for the Images folder.
3 is for the Genetics directory. (Used in breeds.)
4 is for the Body Data directory. (Used in breeds.)
5 is for the Overlay Data directory. (Used in clothes!)
6 is for the Backgrounds directory. (Used for metarooms.)
7 is for the Catalogue directory.
10 is for the My Creatures directory.

"Dependency 2" "chwp.wav"
"Dependency Category 2" 1
"Dependency 3" "myawesomeagent.catalogue"
"Dependency Category 3" 7

And now we're done with making sure our agent displays properly in the creators and will unpack to the right places.  But we still need to include the files in our agent!!!

It is important to make sure that all the files that you expect your user to not have (the new images, new catalogues, and new sounds) are listed here, or they will not be included in the agent.  This will create a "dependency error" for the user.  They are listed twice because they are stating the destination and source names, which are usually the same. One of these lines is needed for each file you require for the object.


inline FILE "myawesomeagentimage.c16" "myawesomeagentimage.c16"
inline FILE "chwp.wav" "chwp.wav"
inline FILE "myawesomeagent.catalogue" "myawesomeagent.catalogue"

Now to look at it all together:
"en-GB"

group AGNT "My Awesome Agent (C3)"

"Agent Type" 0
"Agent Animation File" "myawesomeagentimage.c16"
"Agent Animation Gallery" "myawesomeagentimage"
"Agent Animation String" "0"
"Agent Bioenergy Value" 0
"Remove script" "enum X X XXXX kill targ next scrx X X XXXX 1 scrx X X XXXX 2"
"Script Count" 1
"Script 1" @ "myawesomeagentscript.cos"
"Dependency Count" 3
"Dependency 1" "myawesomeagentimage.c16"
"Dependency Category 1" 2
"Dependency 2" "chwp.wav"
"Dependency Category 2" 1
"Dependency 3" "myawesomeagent.catalogue"
"Dependency Category 3" 7

group DSAG "My Awesome Agent (DS)"

"Agent Type" 0
"Agent Description" "My Awesome Agent is awesome and makes a noise."
"Agent Description-fr" "Ma Awesome Agent est impressionnant et fait un bruit."
"Agent Description-de" "Mein Awesome Agent ist genial und macht ein Gerausch."
"Web Label" "Creatures Caves"
"Web URL" "www.creaturescaves.com"
"Agent Animation File" "myawesomeagentimage.c16"
"Agent Animation Gallery" "myawesomeagentimage"
"Agent Animation String" "0"
"Agent Sprite First Image" 0
"Remove script" "enum X X XXXX kill targ next scrx X X XXXX 1 scrx X X XXXX 2"
"Script Count" 1
"Script 1" @ "myawesomeagentscript.cos"
"Dependency Count" 3
"Dependency 1" "myawesomeagentimage.c16"
"Dependency Category 1" 2
"Dependency 2" "chwp.wav"
"Dependency Category 2" 1
"Dependency 3" "myawesomeagent.catalogue"
"Dependency Category 3" 7

inline FILE "myawesomeagentimage.c16" "myawesomeagentimage.c16"

inline FILE "chwp.wav" "chwp.wav"
inline FILE "myawesomeagent.catalogue" "myawesomeagent.catalogue"


Further reading

 Making Agents for Creatures 3 - CDN
 How to create .agent files for Docking Station and Creatures 3 - CDN
 DSAG PRAY Template - CDN
PRAY Mistakes - CDN